MathAudio THD Meter VST/AU
- Measures Total Harmonic Distortion (THD) in sound cards, speakers and headphones.
- Applies matched filters for maximizing the signal-to-noise ratio (SNR) in the presence of additive stochastic noise.
- Supports microphone calibration files.
- Supports full range of sample rates from 44.1 kHz up to 384 kHz. All sample rates are supported without resampling to avoid any possible loss in accuracy.
- Supports automatic scaling for 4k monitors. Supports manual window resizing (drag the bottom right corner of the window).
- Supports VST, VST3, CLAP on Windows and AU, VST, VST3, CLAP on Mac.
THD Meter Help
MathAudio THD Meter measures THD in accordance with the following formula:

where h1, h2, h3, h4, h5 are harmonics of the sinusoidal signal. THD Meter sets harmonics to zero if their frequency exceeds 20 kHz.
You need an audio cable to connect the "Line In" of your sound card to its "Line Out" to measure THD of the sound card. You also need a microphone if you wish to measure THD of your speakers or headphones. We recommend to measure your sound card before measuring your speakers or headphones to be sure that THD of your sound card is negligible in comparison with THD of you speakers or headphones.
The further steps are as follows:
1. Install THD Meter
Follow the installation instructions inside the ZIP file.
2. Connect your sound card
Connect "Line In" of your sound card to its "Line Out" if you wish to measure THD of your sound card, or connect the input of your sound card to a microphone if you wish to measure THD of your speakers or headphones.
3. Set sample rate to maximum option available
The sound cards accuracy depends on the selected sample rate. The minimum distortion usually corresponds to the maximum sample rate. Set sample rate to maximum option available in "Preferences" of your DAW or in "Control panel" of your sound card.
4. Start THD Meter plug-in
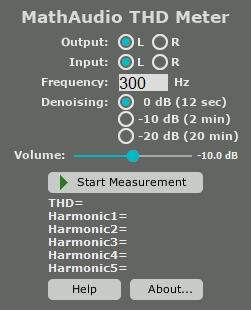
Create a new empty stereo project in your DAW. Then include THD Meter VST/AU plug-in to that project. Make sure that no other plug-ins are included into the chain. Adjust the direct monitoring in your DAW. Open the plug-in window in accordance with the manual of your host software.
5. Select the output of your sound card
THD Meter plug-in measures only one channel per time (left or right). Set the "Output" radio buttons to "L" or "R" in dependence on the desired channel.
6. Select the input of your sound card
- If you measure your sound card, the selected "Input" radio button must correspond to the selected "Output" radio button.
- If you measure your speakers or headphones, select your microphone input.
7. Select the input of your sound card
- If you measure your sound card, the selected "Input" radio button must correspond to the selected "Output" radio button.
- If you measure your speakers or headphones, select your microphone input.
8. Set the desired frequency
Enter the frequency of the test signal between 20 and 10000 Hz.
9. Set the amount of denoising
The self-noise of your sound card, the self-noise of your microphone or the noise in your room can be a problem when you try to measure a very small amount of THD. THD Meter applies matched filters to reduce the noise. Matched filters become more effective when you increase the time of the measurement. The default measurement time is equal to 12 seconds. The amount of the THD error becomes 3 or 10 times smaller if you set the "Denoising" radio buttons to "-10 dB" or "-20 dB" position. The measurement time becomes equal to 2 minutes and 20 minutes correspondingly.
Please note that you can also reduce the THD error by means of increasing the amplitude of the measurement signal.
10. Measure THD
Click the "Start Measurement" button. The indicator below that button will start showing you the time before the end of the measurement and the current amplitude of the first harmonic. If you wish to adjust the amplitude, change the position of the "Volume" slider or use the corresponding control on your audio amplifier, then cancel the measurement and start it ones again.
THD Meter ignores the first second of the test signal, so the sound of your mouse don't increase the measurement error when you work with a microphone.
11. Using microphone calibration file
If you have a calibration file for your microphone, you can use it. THD Meter supports three formats of microphone calibration files: .frd, .cal and .txt. Copy the calibration file to the Documents -> MathAudio THD Meter folder. Then exit your DAW and start it once again. If THD Meter detects a correct calibration file, it shows you a green "CAL" indicator as it is shown below.
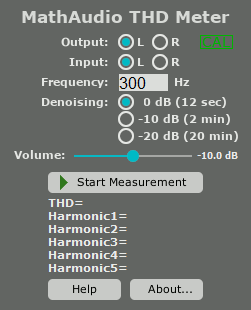
Please don't copy more than one frd/cal/txt file to the Documents -> MathAudio THD Meter folder and don't use your microphone calibration file when your measure THD of your sound card.