MathAudio Guitar EQ VST/AU
- Helps to detect and compensate for the unwanted resonances in classical and acoustic guitars.
- Helps to change the volume and the timbre of every note.
- Improves the quality of the microphone recordings of the guitar sound.
- Allows one to save the fine-tuned target curve and use it with different microphones and pickups.
- Allows one to use the same target curve to make the sound less dependent on the positioning of the microphone.
- Helps to maintain a consistent quality of the sound in different environments (e.g. at home and at studio) by means of loading the same target curve.
- Works with microphones and piezo pickups.
- Provides objective means for evaluation and comparison of classical and acoustic guitars.
- Can be used as a conventional high-resolution equalizer with electric guitars and other musical instruments.
- Works with zero latency. Perfect for direct monitoring and live performances.
- Supports undo/redo operations.
- Supports full range of sample rates from 44,056 kHz up to 384 kHz. All sample rates are supported without resampling to avoid any possible loss in quality.
- Applies 64-bit signal path throughout.
Guitar EQ Help
This tutorial will help you detect and compensate for the unwanted resonances of your guitar.
The body of classical and acoustic guitars is an acousto-mechanical resonator that amplifies sound generated by strings by means of multiple resonances. Ideally, these resonances should be uniformly distributed along the frequency range and have similar gains. In reality, however, some of these resonances usually have larger gains. Our experiments have shown that one or a few strong resonances can destroy the guitar sound because of the so-called "masking effect". We've also found out that the digital correction of the largest guitar resonances can substantially improve the quality of the guitar recordings. The MathAudio Guitar EQ plug-in helps you to detect and compensate for the unwanted guitar resonances. It also allows you to fine-tune the volume and the timbre of every note on your guitar.
You need:
- A conventional plastic pick (1mm). You need such a pick even if you don't use it for playing the guitar.
- A pair of good closed headphones. If you don't have such headphones, a pair of famous Sony MDR-7506 is a safe choice. You can also use MathAudio Headphone EQ to improve the quality of the monitoring.
- A good condenser microphone or a piezo pickup. We don't recommend using dynamic microphones because they have a low signal-to-noise ratio.
If everything is prepared, the further steps are as follows:
1. Install one of the following packages:
- Install Guitar EQ VST plug-in if you want to use it with a VST compatible host software. If you work on Windows, the version of your VST plug-in (x32 or x64) must correspond to the version of your host software.
- Install Guitar EQ AU plug-in if you want to use it with an AU compatible host software.
2. Connect your headphones to the sound card of your computer
3. Connect your microphone or piezo pickup to the sound card of your computer
4. Start the Guitar EQ plug-in
Create a new empty project in your DAW. Adjust the direct monitoring of your microphone or pickup. Make sure that you hear the sound in your headphones when you play the guitar. Then include the Guitar EQ VST/AU plug-in to that project and open the plug-in window in accordance with the manual of your host software.
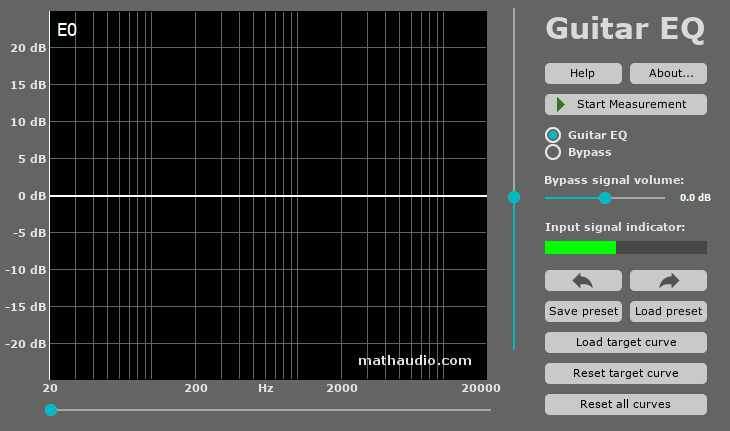
Fig.1. Screenshot of the MathAudio Guitar EQ VST/AU plug-in.
5. Check the presence of the microphone/pickup signal
Make sure that the "Input signal indicator" shows the presence of the mic signal in a green color as it is shown in Fig.1.
6. Measure the frequency response
Click the "Start measurement" button. Use the back side of your pick to knock your guitar's bridge saddle between 3rd and 4th strings as it is shown in Fig.2. Don't use your nail or other things for knocking. Use only a conventional plastic pick. The sound must be loud enough. Your free hand must suppress the sound of strings as it is shown in Fig.2. Listen to the example sound here.
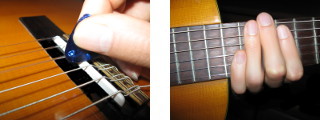
Fig.2. Measurement.
The measurement process takes 5 seconds. You will get the plot of frequency response as it is shown in Fig.3 (your plot will be different).
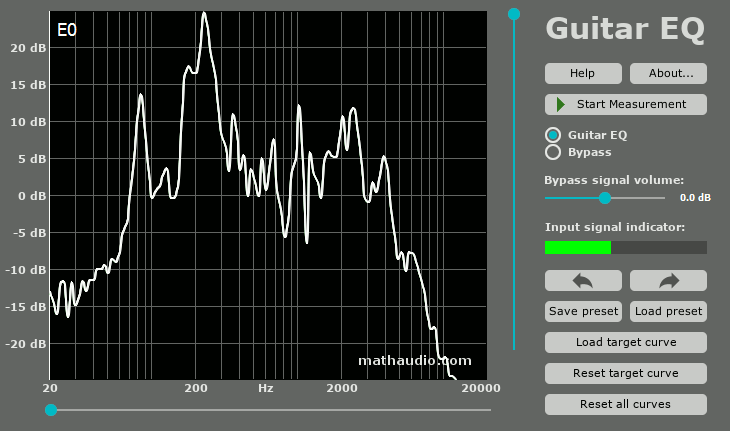
Fig.3. Composite frequency response of guitar, room and microphone (the frequency response of your guitar, room and microphone can be very different).
It is easy to see that the frequency response in Fig.3 contains a few strong resonances. The resonance between 180 and 300 Hz is most harmful because it creates a "boomy" sound.
Guitar EQ allows you to detect the guitar note corresponding to every resonance. For example, let us detect the note corresponding to the largest guitar resonance. Use the slider under the plot to move the cursor to the largest resonance as it is shown in Fig.4. The name of the note is shown on the left upper corner of the plot as it is shown in Fig.4 (see the red arrow). You can play that note and the volume indicator will show you that this note is really louder than other notes.
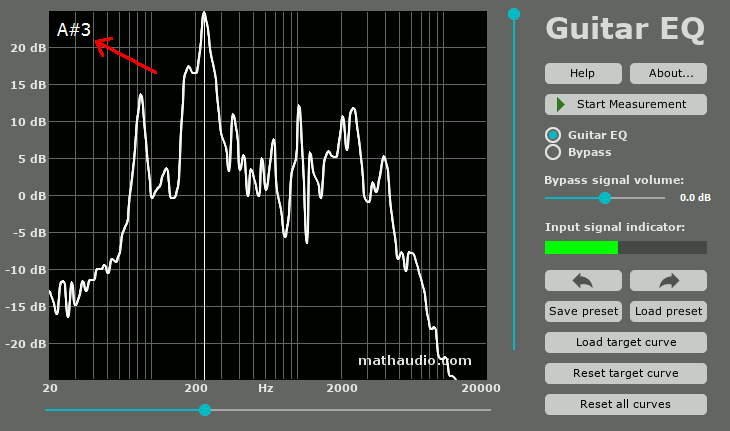
Fig.4. Detection of the note corresponding to the largest resonance.
7. Add a reverb plug-in if you need it
If you are going to apply a reverb to the sound of your guitar, add the reverb plug-in now (after the Guitar EQ).
8. Cut out the largest resonance peaks
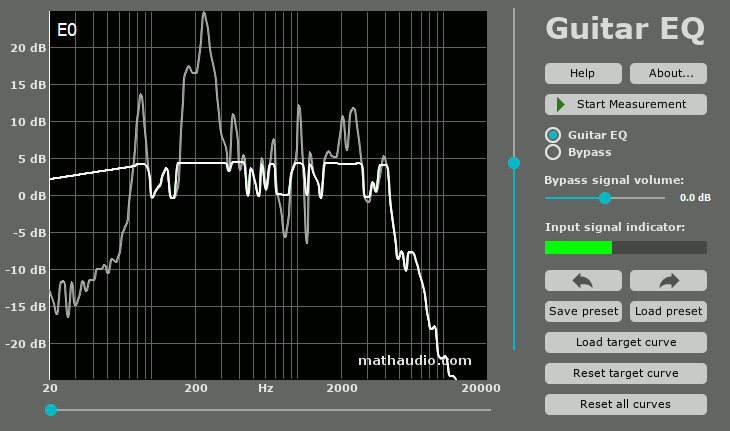
Wear your headphones. Modify the resultant frequency response (target curve) and listen to the result. MathAudio Guitar EQ contains a convenient tool for drawing your own target curve. Just move the cursor of your mouse to the frequency response window, press the left button of the mouse and draw straight lines. You can also use the right button of the mouse to draw arbitrary lines. Use your mouse to cut out the resonance peaks as it is shown in Fig.5. Use the "Reset target curve" button if you wish to reset your changes. Play your guitar and listen to the sound. Verify every correction by clicking the "Undo" and "Redo" buttons. There are no rules: trust your ears more than your eyes. Every correction must improve the sound.
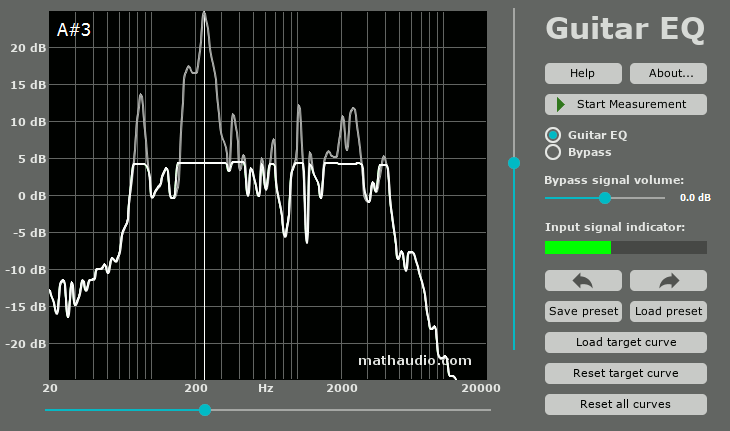
Fig.5. Correction of peaks. Original frequency response (gray line) and target curve (white line).
9. Increase the volume of silent notes
The frequency response in Fig.5 still contains a few deep notches that correspond to silent notes G#5 and D6. The latter note is not accessible on a conventional 6-string guitar, however, it should be corrected to improve the timbre of the D5 and D4 notes. The results of the correction are shown in Fig.6.

Fig.6. Correction of deep notches.
10. Change bass or treble regions if necessary
Listen to the processed sound of your guitar. If you miss bass or treble frequencies, change the target curve. Fig.7 shows the target curve with boosted low frequencies.
Tip: If you want to correct the invisible part of the target curve, simply move the vertical slider up, make the necessary correction and move the vertical slider down.
Fig.7. Correction of deep notches.
11. Compare the processed sound of your guitar with its original sound
Make sure that the "Guitar EQ" radio button is selected as it is shown in Fig.8 (a). Play music. Remember the loudness of the processed sound of your guitar. Then click the "Bypass" radio button to listen to the original (unprocessed) sound and move the "Bypass signal volume" slider left until the loudness of the original sound becomes equal to the loudness of the processed sound: equal loudness is necessary for correct comparison of the processed and original (unprocessed) sounds. Switch "Guitar EQ" and "Bypass" radio buttons and adjust the position of the volume slider until the loudness of the processed sound will be equal to the loudness of the original (unprocessed) sound (see Fig.8 (b) and (c)). Compare the qualities of the processed and original (unprocessed) sounds.

Fig.8. Making audio test.
12. Save preset
Select the "Guitar EQ" radio button and click the "Save preset" button to save the accurate state of the plug-in as a .gtr file. This file will help you to restore the state of the plug-in if necessary.
13. Use the saved target curve to maintain a consistent timbre of the sound when you change the location of your microphone or the recording environment.
Making a good target curve for your guitar may take a substantial amount of your time. However, the perfect sound can become much worse if you change the location of your microphone or change the room. There is a quick solution: measure your guitar once again and use the "Load target curve" button to load the target curve from your old preset. The sound will become noticeably closer to the old one, but the plots can be very different as it is shown in Fig.9. You can use the vertical slider to change the volume of the processed sound.
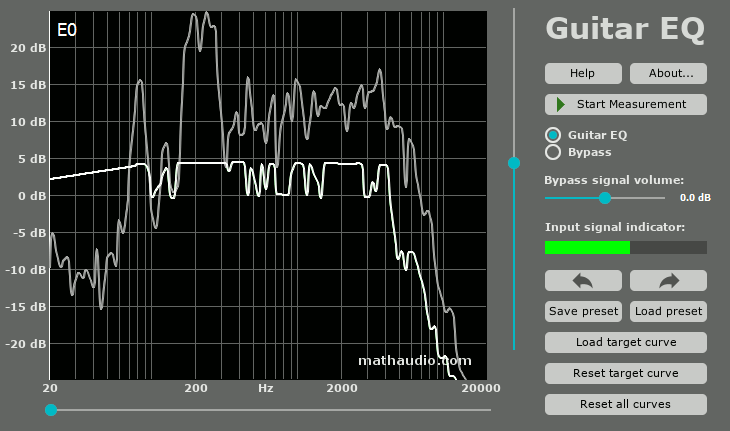
Fig.9. Applying an old target curve to a new freqency response.