MathAudio Room EQ VST/AU and Room EQ for Foobar2000

- Corrects deficiencies of room acoustics (multipoint compensation).
- Corrects acoustic imperfections of speakers.
- Avoids the pre-echo (pre-ringing) problem of conventional convolver-based room correction systems. The absence of pre-echo ensures the neutrality of the sound.
- Works in rooms, halls and outdoor venues of any size.
- Works with zero latency. Suitable for real-time applications. Perfect for live performances and studio monitoring. Doesn't delay the audio track when playing video.
- Performs frequency response correction, phase response correction and time domain correction.
- Quells resonance peaks of frequency response while leaving the deep notches. Avoids the overcompensation which happens in conventional linearizing room correction systems.
- Manually adjustable level of compensation allows one to reach the maximum transparency of the sound.
- Supports full range of sample rates from 44.1 kHz up to 384 kHz. All sample rates are supported without resampling to avoid any possible loss in quality.
- Includes a custom target curve feature.
- Applies 64-bit signal path throughout.
- Works with USB measurement microphones (e.g. MiniDSP UMIK-1 or Dayton Audio UMM-6) or standard measurement microphones (e.g. NADY CM100 or Dayton Audio EMM-6).
- Supports microphone calibration files.
- Automatically adjusts left/right speaker balance.
- Applies a patented method of frequency response correction.
- Works as a simple conventional mouse drawing EQ if necessary: load a new instance of Room EQ, select the "Room EQ" radio button, move the cursor of your mouse to one of the frequency response windows, press the left button of the mouse and draw your own frequency response.
- Supports automatic scaling for 4k monitors. Supports manual window resizing (drag the bottom right corner of the window).
- Supports VST, VST3, CLAP, Foobar2000 on Windows and AU, VST, VST3, CLAP on Mac.
Room EQ Help
This tutorial will help you modify the sound of your speakers in order to compensate for the acoustic disadvantages of your room and your speakers.
The fidelity of the speakers sound depends on both the quality of the speakers and the room acoustics. The imperfections of the speakers and the imperfections of the room acoustics can be compensated for by means of the MathAudio Room EQ software.
You need a measurement microphone to measure the frequency response of your room and your speakers. It can be a USB measurement microphone (e.g. MiniDSP UMIK-1 or Dayton Audio UMM-6) or a conventional measurement microphone (e.g. Dayton Audio EMM-6, NADY CM100 or Behringer ECM8000). Please note that the conventional measurement microphones require phantom power from the preamp in order to operate. If you will use a conventional measurement microphone, you need a mic preamp (e.g. Nady DMP-2 or Rolls MP13) to use a conventional measurement mic with your computer sound system.

Fig.1. Measurement mictophone (Behringer ECM8000).
If the microphone is prepared, the further steps are as follows:
1. Install Room EQ
Follow the install instruction inside the ZIP file.
2. Connect your loudspeakers to the sound card of your computer
3. Connect the microphone to the sound card of your computer
4. Start the Room EQ plug-in
- If you use the VST/AU/CLAP version of the plug-in, you need to create a new empty stereo project for measurement. Adjust the direct monitoring of your measurement microphone. Make sure that you hear the sound of the measurement microphone in one of your speakers when you touch the measurement microphone. Then include the Room EQ VST/AU/CLAP plug-in to that project and open the plug-in window in accordance with the manual of your host software.
- If you use the Foobar2000 version of the plug-in, click File - Preferences - Playback - DSP Manager, then click "+" next to "MathAudio Room EQ" in the right pane to move Room EQ to the "Active DSPs" pane. After that click "..." in the "Active DSPs" pane to open the Room EQ's editor.
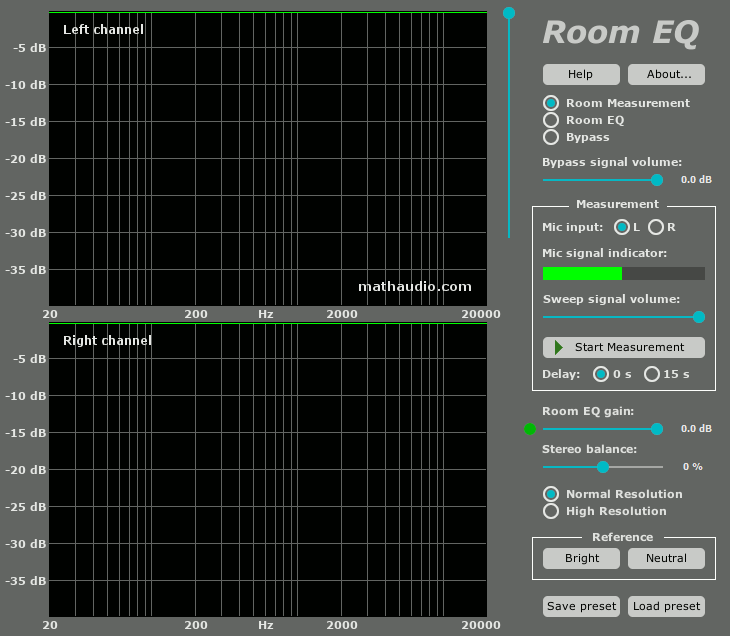
Fig.2. Screenshot of the MathAudio Room EQ VST/AU/CLAP plug-in.
5. Switch plug-in to the Room Measurement mode
- Select the "Room Measurement" radio button to activate the Room Measurement mode.
- Select the correct mic input by means of the "Mic input" radio buttons. If you use the VST/AU/CLAP version of the plug-in, the microphone input device coincides with the input device of your DAW and you can change it in your DAW settings if necessary. If you use the Foobar2000 version of the plug-in, you can change your microphone input device by means of the additional "In/Out" button which is shown below.

Fig.3. The "In/Out" button (Foobar2000 version of the plug-in).
- Make sure that the "Mic signal indicator" shows the presence of the mic signal in a green color as it is shown in Fig.2. Please note that the Room EQ plug-in interrupts the signal path in the measurement mode, so you cannot hear the sound of the microphone in your speakers when the measurement mode is activated.
If you have a calibration file for your microphone, you can use it. Just rename the calibration file to calibration.frd, calibration.cal or calibration.txt and copy it to the Documents -> MathAudio Room EQ folder. Then exit your DAW (or Foobar2000) and start it once again. The name of the calibration file will be shown at the top right corner of the graphical area as it is shown below.

Please don't copy more than one frd/cal/txt file to the Documents -> MathAudio Room EQ folder!
6. Measure the frequency response of your room and your speakers
- Plan to make no less than 5-10 measurements. The measurement locations must be uniformly distributed within the area of possible locations of all listeners. You can use the following example diagrams where the measurement points are shown in green color.

- Place the microphone at your ear height. Set it vertically. The microphone should not be near reflective objects or sound absorbing upholstery. It is very convenient to use a microphone stand.
- Click the "Start Measurement" button.
- Wait until the end of the measurement (about 10 seconds). Then move the microphone to the next measurement location and click the "One more measurement" button in the prompt window. Repeat this procedure in all the necessary measurement locations. Click the "Finish" button in the prompt window after finishing the last planned measurement. You will get the plots of frequency responses as it is shown in Fig.4 (your plots will be different). The "Redo the last measurement" button may be used if an occasional loud sound has happened during the measurement (e.g. dog barking).
- Click the "Save preset" button to save the frequency response of your speakers as a .snr file.
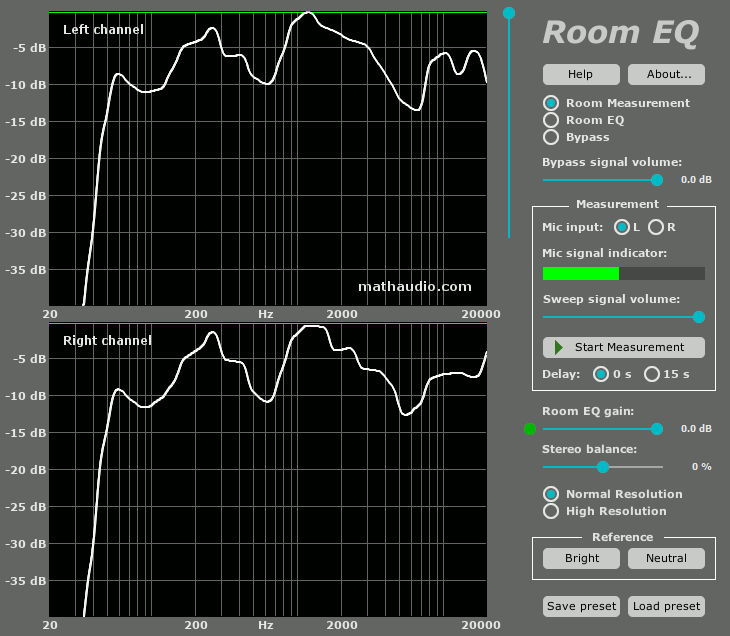
Fig.4. Composite frequency response of room and speakers (the frequency response of your room and speakers can be very different).
7. Switch plug-in to the Room EQ mode
- If you use the VST/AU/CLAP version of the plug-in, use the "Save preset" button to save the frequency response. Then include the Room EQ plug-in to your working project as the last audio effect and load the frequency response by means of the "Load preset" button. After that click the "Room EQ" radio button to activate the Room EQ mode.
- If you use the Foobar2000 version of the plug-in, just click the "Room EQ" radio button. If you use other audio effect plug-ins, make sure that Room EQ is included as the last audio effect in the chain.
8. Choose the reference frequency response
Click the "Bright" button to get a standard flat frequency response of ideal speakers or click the "Neutral" button if you want to get the frequency response of ideal speakers with a h.f. roll-off. The latter reference response will ensure more neutral sound of your speakers.
9. Move down the vertical slider
Move down the vertical slider and release it to cut out some part of the main resonances as it is shown in Fig.5.
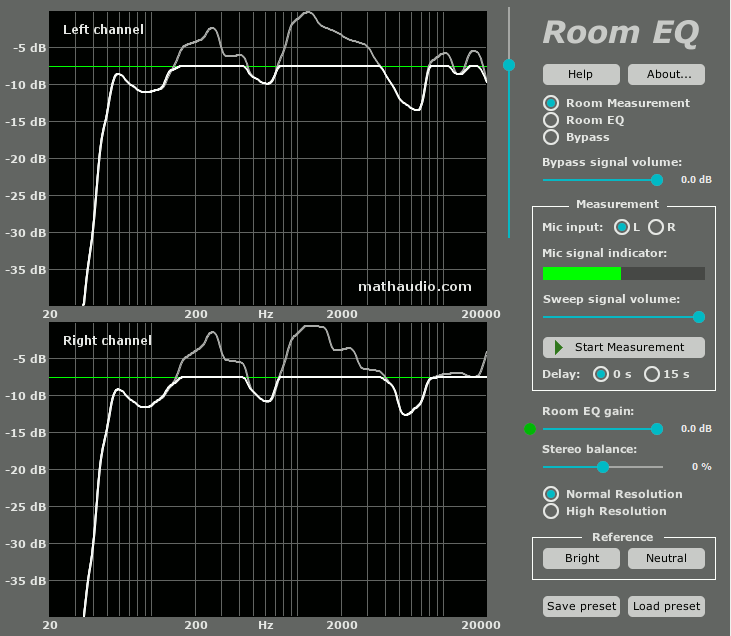
Fig.5. Cutting out a part of the main resonances of the room and speakers.
The resultant processed frequency response of your room and speakers will be shown by a white line as it is shown in Fig.5. It is possible to see that the main resonances of the resultant frequency response (white line) became much smaller. Such resonances added unnatural timbre to the sound. The removal of the resonances dramatically improves the sound.
It is also possible to see that MathAudio Room EQ doesn't boost the spectral components lying below the green line. This important feature prevents the large excursions of the speaker diaphragm that can be caused by the ideal linearization of the frequency response. Besides that this feature allows you to avoid the overcompensation of your room. As a result you will not get a muddy sound that is peculiar to conventional linearizing equalizers.
10. Compare processed sound of your speakers with their original sound
Make sure that the "Room EQ" radio button is selected as it is shown in Fig.6 (a). Play music. Remember the loudness of the processed sound of your speakers. Then click the "Bypass" radio button to listen to the original (unprocessed) sound and move the "Bypass signal volume" slider left until the loudness of the original sound becomes equal to the loudness of the processed sound: equal loudness is necessary for correct comparison of the processed and original (unprocessed) sounds. Switch "Room EQ" and "Bypass" radio buttons and adjust the position of the volume slider until the loudness of the processed sound will be equal to the loudness of the original (unprocessed) sound (see Fig.6 (b) and (c)). Compare the qualities of the processed and original (unprocessed) sounds.

Fig.6. Making audio test.
11. Change the position of the vertical slider and repeat the test
You need to make at least a few experiments to find the optimum location of the vertical slider. The optimum location of the vertical slider corresponds to the maximum fidelity and transparency of the sound. Your ears have the final say.
Move the vertical slider up and down a little and compare original and processed sounds. Don't forget to adjust the loudness of the original sound for correct comparison of the processed and original sounds. Different positions of the vertical slider result in different shapes of the frequency response (compare Fig.5 and Fig.7).
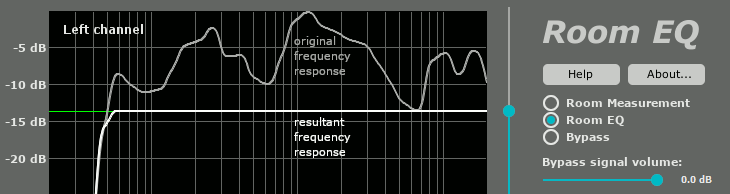
Fig.7. Resultant frequency response (white line) corresponding to a low position of the vertical slider.
If the volume of the processed sound is not sufficient for comfortable listening, make sure that all volume controls of your hardware and software are located in their maximum positions. If the volume of the processed sound is still not sufficient, choose a higher position of the vertical slider.
If unpleasant rattling is present at low frequencies, you also need to choose a higher position of the vertical slider.
Repeat the audio test for different positions of the vertical slider and choose the best one. Leave the best position for the permanent use.
12. Choose the resolution
Switch "High resolution" and "Normal resolution" radio buttons and compare the sound. Leave the resolution which corresponds to a better sound. If you hear no difference, leave the switch in the "Normal resolution" position because it puts less load on the CPU.
13. Adjust the left/right stereo balance if necessary
Room EQ automatically sets the left/right stereo balance. The "Stereo balance" slider can be used to manually adjust it if necessary. You can use the mouse wheel to accurately set the slider position. Double-click the slider to set it to the default zero position.
14. Draw and try your own reference frequency response if you still wish to change something in the sound
This step is optional and can be recommended for those who want to fine-tune the timbre of the sound. For example, you can modify the built-in reference frequency responses and listen to the result. MathAudio Room EQ contains a convenient tool for drawing your own reference frequency response. Just move the cursor of your mouse to one of the frequency response windows, press the left button of the mouse and draw your own frequency response. The mouse wheel can be used to change the reference curve on one of the plots (left or right).
15. Adjust the position of the "Room EQ gain" slider
Room EQ doesn't clip the sound. However, the amplitude of its output signal can exceed 0 dB. If you use the volume control and the clip indicator of your host program, set the "Room EQ gain" slider to 0 dB and don't use it any more. Otherwise, play an audio file and look at the indicator which is shown in Fig.8. The red color of this indicator means that the amplitude of the Room EQ output signal exceeds 0 dB. Click the indicator to move the "Room EQ gain" slider to the position corresponding to 0 dB output. Repeat this process with a few other audio files.
![]()
Fig.8. Indicator.
16. Save preset
Select the "Room EQ" radio button and click the "Save preset" button to save the accurate state of the plug-in as a .snr file. This file will help you to restore the state of the plug-in if necessary.